Spring Boot
Spring Boot Fundamentals
Core Features
Spring Boot builds on the Spring Framework. It does not replace Spring or provide a different dependency injection container. Instead, it makes Spring applications faster to configure, run, test, and deploy by providing sensible defaults and production-oriented tooling.
| Feature | Purpose |
|---|---|
| Starters | Provide a curated set of dependencies for a capability such as web, data access, or testing. |
| Auto-configuration | Conditionally configures beans based on the classpath, properties, and beans already defined. |
| Embedded runtime | Lets a web application run as a standalone process without deploying it to a separate server. |
| Externalized configuration | Reads configuration from properties files, YAML, environment variables, and command-line arguments. |
| Actuator | Exposes production features such as health, metrics, and application information. |
| Build plugins | Package applications as executable archives and create container images. |
A starter answers “which dependencies do I need?”, while auto-configuration answers “how should those dependencies be configured?”. Auto-configuration is conditional and non-invasive: when the application defines its own bean, Spring Boot normally backs away from the corresponding default. The details are covered in Configuration and Auto-configuration.
Interview point: Spring Boot is opinionated, not restrictive. It supplies defaults when conditions match, but explicit application configuration takes precedence.
See Using Auto-configuration and Spring Boot Features.
Creating Your First Spring Boot Application
Create a project with Spring Initializr, select Java and Maven or Gradle, and add the capability starters the application needs. Place the main class in a root package so that component scanning includes the application’s subpackages.
@SpringBootApplication combines the three annotations normally needed by the entry point:
@SpringBootConfiguration: identifies the primary configuration class.@EnableAutoConfiguration: enables Spring Boot auto-configuration.@ComponentScan: discovers components in the class’s package and subpackages.
package com.example.todo;

import org.springframework.boot.SpringApplication;
import org.springframework.boot.autoconfigure.SpringBootApplication;

@SpringBootApplication
public class TodoApplication {
	public static void main(String[] args) {
		SpringApplication.run(TodoApplication.class, args);
	}
}
SpringApplication.run() prepares the environment, creates and refreshes the application context, and starts an embedded server when the classpath describes a web application. Controllers and the rest of the todo example are introduced in the web and REST modules.
Run during development from the IDE, with ./mvnw spring-boot:run, or with ./gradlew bootRun. The next topic covers packaging the application for distribution.
Interview point: The main class should usually be above the other application packages.
@ComponentScanstarts from that package, so placing it too deep can prevent components from being discovered.
See Developing Your First Spring Boot Application and Structuring Your Code.
Executable Packaging
The Spring Boot Maven and Gradle plugins can repackage an application as an executable JAR. Application classes are stored under BOOT-INF/classes, dependency JARs under BOOT-INF/lib, and Spring Boot Loader starts the nested application. The result can run directly with java -jar application.jar.
- Maven uses the Spring Boot plugin’s
repackagegoal, commonly invoked by./mvnw package. - Gradle uses the
bootJartask, commonly invoked by./gradlew bootJar. - Layered archives separate application code from dependencies, improving container-image layer reuse.
- Traditional WAR deployment remains available for servlet applications and is covered later.
Unlike a shaded “uber JAR”, a Boot archive keeps dependencies as nested JARs and uses Spring Boot Loader to launch them. This preserves dependency boundaries and supports predictable executable and layered archive layouts.
Interview point: A Spring Boot executable JAR contains application classes, nested dependency JARs and a launcher, so it can run with
java -jarwithout a separately installed application server.
See Packaging Executable Archives and The Executable JAR Format.
Spring Boot DevTools
The spring-boot-devtools module improves the local development feedback loop. Declare it as an optional Maven dependency or in Gradle’s developmentOnly configuration so that other modules do not inherit it.
Its main features are:
- Automatic restart: recompiling a classpath file restarts the application context.
- Faster restarts: stable dependencies use a base classloader while changing application classes use a restart classloader that can be discarded and recreated.
- Development defaults: caching and selected logging settings are adjusted for development.
- Condition delta logging: after restart, changes to auto-configuration matches are reported.
DevTools watches compiled classpath output, not source files directly. In IntelliJ IDEA, building the project updates the classpath and triggers restart. Static resources and templates are excluded from full restart by default.
Fully packaged applications launched with java -jar disable DevTools automatically, and repackaged archives exclude it by default. Do not force-enable it in production. Restart can be disabled with spring.devtools.restart.enabled=false; a trigger file can be configured when continuous IDE compilation causes unwanted restarts.
LiveReload is deprecated as of Spring Boot 4.1. Automatic application restart remains available.
Interview point: DevTools restart is not JVM hot code replacement. It creates a new restart classloader and refreshes the application, while retaining dependency classes in a stable base classloader.
See Developer Tools.
Configuration and Auto-configuration
Externalized Configuration
Spring Boot places configuration from many sources into the Spring Environment. This lets the same application artifact run in different environments without rebuilding it. Common sources include:
application.propertiesorapplication.yamlinside the application.- Profile-specific files such as
application-test.properties. - Files outside the packaged JAR.
- OS environment variables and Java system properties.
- Command-line arguments such as
--server.port=9090. - Test-specific properties.
Property sources have a defined precedence: a value from a later, higher-precedence source overrides an earlier one. In the common deployment path, command-line arguments override system properties, which override environment variables, which override external config files, which override packaged config files. Within config data, profile-specific and external files take precedence over their packaged, non-profile-specific equivalents.
There are three main ways to read values:
| API | Best use |
|---|---|
@ConfigurationProperties | Type-safe binding of a related group of properties. |
@Value | Injecting an isolated value or expression. |
Environment | Programmatic lookup when the property name or access time is dynamic. |
For example, the keys app.mail.host, app.mail.port, and app.mail.timeout can be bound as one immutable object. An environment variable such as APP_MAIL_HOST can override the host through relaxed binding.
package com.example.mail;

import java.time.Duration;

import org.springframework.boot.context.properties.ConfigurationProperties;

@ConfigurationProperties("app.mail")
public record MailProperties(
	String host,
	int port,
	Duration timeout
) {}
package com.example.mail;
import org.springframework.boot.context.properties.EnableConfigurationProperties;
import org.springframework.context.annotation.Configuration;
@Configuration(proxyBeanMethods = false)
@EnableConfigurationProperties(MailProperties.class)
public class MailConfiguration {}package com.example.mail;
import org.springframework.stereotype.Service;
@Service
public class MailService {
private final MailProperties properties;
public MailService(MailProperties properties) {
this.properties = properties;
}
public String endpoint() {
return "%s:%d".formatted(properties.host(), properties.port());
}
}@EnableConfigurationProperties registers specific property classes. @ConfigurationPropertiesScan is convenient when the main application should discover all such classes. Add Bean validation annotations and @Validated when invalid or missing configuration should fail application startup.
spring.config.location replaces the default config-data locations, while spring.config.additional-location adds to them. Prefer one file format per location because a .properties file takes precedence over YAML in the same location.
Interview point:
@ConfigurationPropertiesprovides grouped, type-safe, relaxed binding. Prefer it over many unrelated@Valuefields for application-specific configuration.
See Externalized Configuration and Properties and Configuration.
How Auto-configuration Works
Auto-configuration is activated by @EnableAutoConfiguration, normally through @SpringBootApplication. It examines conditions such as:
- Whether a class is present on the classpath.
- Whether an application bean already exists.
- Whether a property has a particular value.
- Whether the application is servlet, reactive, or non-web.
For example, adding the persistence starter (spring-boot-starter-data-jpa) and a JDBC driver allows Spring Boot to configure a DataSource, EntityManagerFactory, transaction manager, and Spring Data repository infrastructure. Application code consumes the resulting beans just like explicitly configured Spring beans:
package com.example.database;

import java.sql.SQLException;
import javax.sql.DataSource;
import org.springframework.stereotype.Component;

@Component
public class DatabaseConnectionInfo {
	private final DataSource dataSource;

	public DatabaseConnectionInfo(DataSource dataSource) {
		this.dataSource = dataSource;
	}

	public String productName() throws SQLException {
		try (var connection = dataSource.getConnection()) {
			return connection.getMetaData().getDatabaseProductName();
		}
	}
}
The application does not need to instantiate the connection pool. It supplies dependencies and connection properties; Spring Boot supplies infrastructure when all conditions match. Start with --debug to print the conditions evaluation report and diagnose why a configuration matched or backed off.
Do not call bean methods inside auto-configuration classes directly. The auto-configuration class name is public API only so applications can exclude that configuration. Its bean methods, bean names, and nested configuration classes are implementation details that may change between Spring Boot releases. Calling one directly can also bypass its conditions, property binding, dependency resolution, and container lifecycle, potentially creating an unmanaged or duplicate infrastructure object. Instead, inject the resulting public type, such as DataSource, and customize it through supported properties, an application-defined bean, or an auto-configuration exclusion.
Interview point: Auto-configuration is ordinary conditional configuration. It creates infrastructure beans only when its classpath, property, application-type, and missing-bean conditions match.
See Auto-configuration.
Overriding Auto-configured Defaults
Use the least invasive override that solves the requirement:
- Set a supported property to customize the existing auto-configured bean.
- Define an application bean when a different implementation is required.
- Exclude an auto-configuration when the entire feature should be disabled or configured manually.
Most infrastructure auto-configurations use @ConditionalOnMissingBean. Defining a DataSource therefore makes the default data-source configuration back off:
package com.example.database;

import javax.sql.DataSource;

import com.zaxxer.hikari.HikariDataSource;
import org.springframework.boot.jdbc.autoconfigure.DataSourceProperties;
import org.springframework.context.annotation.Bean;
import org.springframework.context.annotation.Configuration;

@Configuration(proxyBeanMethods = false)
public class DatabaseConfiguration {
	@Bean
	DataSource dataSource(DataSourceProperties properties) {
		return properties.initializeDataSourceBuilder()
			.type(HikariDataSource.class)
			.build();
	}
}
This bean still uses the values bound under spring.datasource, but the application now controls its construction. If the whole feature is unwanted, exclude its auto-configuration with the exclude attribute of @SpringBootApplication or with the spring.autoconfigure.exclude property. Use excludeName when the class itself is not on the compile classpath.
Avoid excluding a large auto-configuration merely to change one setting. Property customization preserves Boot’s lifecycle management and future improvements with less application code.
Interview point: Properties customize an auto-configuration; an application bean replaces a conditional default; an exclusion disables the auto-configuration itself.
See Gradually Replacing Auto-configuration and Configure a Custom DataSource.
Spring Data JPA
Configuring JPA with Spring Boot
The Java Persistence API (JPA), now standardized as Jakarta Persistence, defines how Java objects are stored in relational databases. A class marked with @Entity represents persistent data; annotations map the class to a table, fields to columns, and object relationships to foreign-key relationships. Instead of manually converting every JDBC row into an object, application code can use the EntityManager API to persist new entities, find them by primary key, remove them, and execute queries over entity types.
An EntityManager works with a persistence context, which tracks the entity objects managed during a unit of work. Within a transaction, changes to a managed entity are detected automatically and synchronized with the database during a flush, commonly before commit; an explicit update call is usually unnecessary. JPA defines these contracts but does not implement them. Hibernate is the default persistence provider supplied by the Spring Boot JPA starter: it performs the mapping, generates and executes SQL, and manages entity state. Spring Data JPA builds repository abstractions on top, while Spring Boot configures the DataSource, entity manager, and transaction manager from spring.datasource.* and spring.jpa.* properties when spring-boot-starter-data-jpa and a database driver are present.
Boot scans the auto-configuration packages for @Entity, @Embeddable, and @MappedSuperclass types, so persistence.xml is normally unnecessary. Keep entities below the main application’s package or customize scanning with @EntityScan.
package com.example.catalog.product;

import java.math.BigDecimal;
import java.util.Optional;

import jakarta.persistence.EntityManager;
import org.springframework.stereotype.Service;
import org.springframework.transaction.annotation.Transactional;

@Service
public class ProductService {
	private final EntityManager entityManager;

	public ProductService(EntityManager entityManager) {
		this.entityManager = entityManager;
	}

	@Transactional
	public Product create(String name, BigDecimal price) {
		var product = new Product(name, price);
		entityManager.persist(product);
		return product;
	}

	@Transactional(readOnly = true)
	public Optional<Product> findById(long id) {
		return Optional.ofNullable(entityManager.find(Product.class, id));
	}
}
package com.example.catalog.product;
import java.math.BigDecimal;
import jakarta.persistence.Column;
import jakarta.persistence.Entity;
import jakarta.persistence.GeneratedValue;
import jakarta.persistence.GenerationType;
import jakarta.persistence.Id;
@Entity
public class Product {
@Id
@GeneratedValue(strategy = GenerationType.IDENTITY)
private Long id;
@Column(nullable = false)
private String name;
@Column(nullable = false, precision = 12, scale = 2)
private BigDecimal price;
protected Product() {}
public Product(String name, BigDecimal price) {
this.name = name;
this.price = price;
}
public Long getId() {
return id;
}
public String getName() {
return name;
}
public BigDecimal getPrice() {
return price;
}
}The no-argument constructor is required by JPA and may be protected. Because @Id is placed on a field, JPA uses field access and can populate the private fields directly. Transactions should usually be defined at the service boundary so one business operation has one persistence context and transaction.
For local experiments, spring.jpa.hibernate.ddl-auto=create-drop can create and remove the schema. For production, prefer a versioned migration tool such as Flyway or Liquibase. Consider setting spring.jpa.open-in-view=false in web applications so lazy database access cannot leak into the controller or view layer.
Interview point: Spring Boot configures the JPA infrastructure; JPA maps and manages entities; Hibernate implements JPA. These are related but distinct responsibilities.
See JPA and Spring Data JPA and the EntityManager API.
Creating Spring Data JPA Repositories
Spring Data JPA creates a runtime implementation of a repository interface. Extending JpaRepository<Entity, IdType> supplies CRUD operations, paging, sorting, batch operations, and JPA-specific methods. Additional queries can be derived from method names or declared with @Query.
package com.example.catalog.product;

import java.math.BigDecimal;
import java.util.List;

import org.springframework.data.domain.Page;
import org.springframework.data.domain.Pageable;
import org.springframework.data.jpa.repository.JpaRepository;
import org.springframework.data.jpa.repository.Query;
import org.springframework.data.repository.query.Param;

public interface ProductRepository extends JpaRepository<Product, Long> {
	Page<Product> findByNameContainingIgnoreCase(String text, Pageable pageable);

	@Query("select p from Product p where p.price <= :maximum order by p.price")
	List<Product> findAffordableProducts(@Param("maximum") BigDecimal maximum);
}
package com.example.catalog.product;
import java.math.BigDecimal;
import java.util.List;
import org.springframework.data.domain.Page;
import org.springframework.data.domain.PageRequest;
import org.springframework.stereotype.Service;
import org.springframework.transaction.annotation.Transactional;
@Service
public class ProductCatalog {
private final ProductRepository products;
public ProductCatalog(ProductRepository products) {
this.products = products;
}
@Transactional(readOnly = true)
public Page<Product> search(String text, int page, int size) {
return products.findByNameContainingIgnoreCase(
text,
PageRequest.of(page, size)
);
}
@Transactional(readOnly = true)
public List<Product> affordable(BigDecimal maximum) {
return products.findAffordableProducts(maximum);
}
}The derived method name is parsed into a case-insensitive LIKE query plus pagination. The @Query method uses JPQL, so Product and price refer to the entity and its field rather than a table and column. Native SQL is also supported, but it is database-specific.
Repository interfaces under the application’s auto-configuration package are detected automatically. Use @EnableJpaRepositories only when repository locations or advanced repository behavior need explicit control.
save() persists a new entity or merges an existing one based on Spring Data’s new-entity detection. Keep multi-repository operations in a transactional service rather than treating each repository call as a complete business transaction.
Interview point: A Spring Data repository is an interface backed by a generated proxy. Derived queries reduce boilerplate, while
@Queryhandles queries that would make method names unclear or unwieldy.
See Spring Data JPA Repositories, Defining Repository Interfaces and JPA Query Methods.
JDBC vs. JPA
JDBC and JPA both access relational databases, but they sit at different abstraction levels. JDBC is the lower-level Java database API: the application opens connections, executes SQL, and turns result rows into Java objects. Spring’s JdbcTemplate removes repetitive connection, statement, cleanup, and exception-handling code, but SQL and row mapping remain explicit. JPA is a higher-level persistence specification for object-relational mapping: the application models tables as entities and works through an EntityManager or Spring Data repositories. A provider such as Hibernate implements JPA, generates SQL, tracks entity state, and ultimately uses JDBC underneath to talk to the database. In short, JDBC gives more direct SQL control, while JPA gives more abstraction and productivity for entity-centered persistence.
Spring Data is an umbrella project rather than another database-access technology. Spring Data JPA builds repositories on JPA, while Spring Data JDBC is a separate, simpler repository module built on JDBC. Spring Data JDBC should not be confused with using Spring Framework’s JdbcTemplate, which is the JDBC approach compared with JPA below.
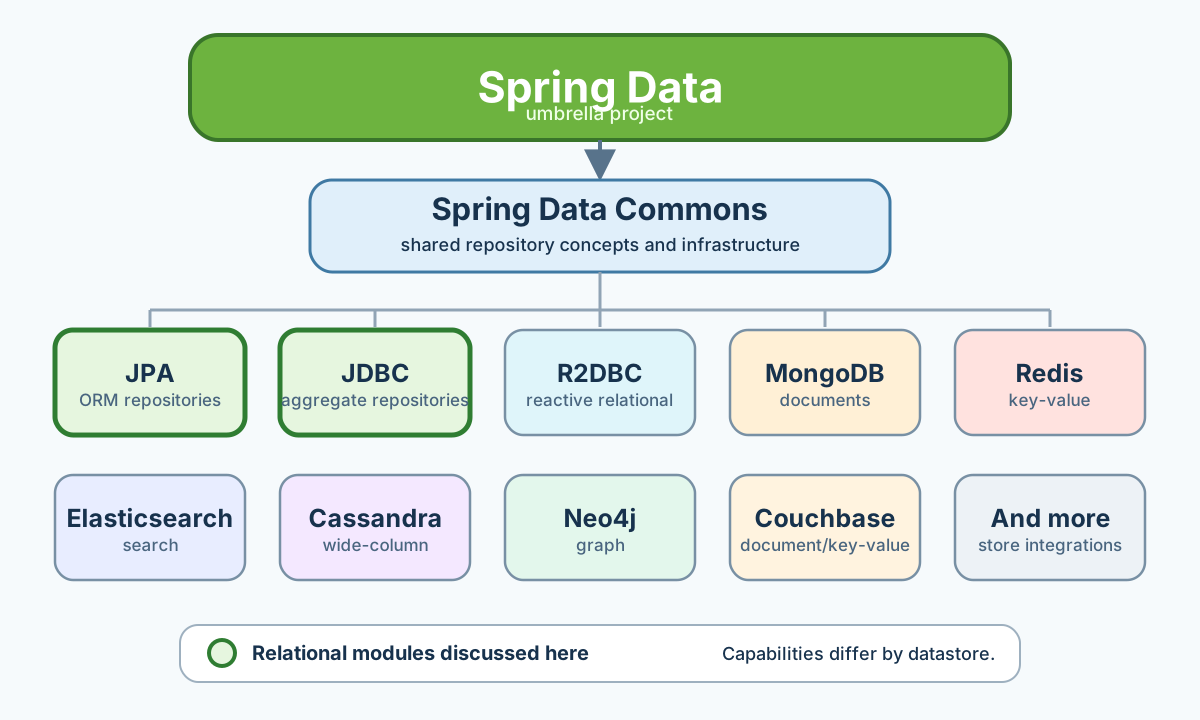
Spring Data provides a common repository style, but each module integrates with a different datastore or persistence technology and has different capabilities.
| Concern | JDBC with JdbcTemplate | JPA |
|---|---|---|
| Main model | SQL statements and result rows | Entities, relationships, and a persistence context |
| Queries | SQL is written explicitly | Generated SQL, JPQL, criteria queries, or native SQL |
| Object mapping | The application maps rows, usually with a RowMapper | The provider maps rows using entity metadata |
| Updates | The application issues each INSERT, UPDATE, or DELETE | Changes to managed entities can be detected and written during flush |
| Control | Direct control over SQL and database-specific features | Higher-level convenience, with less direct control over generated SQL |
| Common risks | Repetitive SQL and manual mapping | Unexpected queries, lazy-loading errors, and the N+1 query problem |
| Good fit | Reporting, complex SQL, bulk operations, and query-focused data access | Entity-centered CRUD and business operations involving relationships |
JPA reduces persistence boilerplate, but it does not remove the need to understand SQL. Developers still need to inspect generated queries and choose fetch strategies carefully. JDBC is often simpler when a use case is naturally expressed as one precise SQL query. A single application may use both: JPA for most entity operations and JDBC for specialized queries or bulk work. Both can participate in Spring-managed transactions.
Interview point: JDBC gives the application explicit SQL and manual row mapping; JPA provides object-relational mapping, managed entity state, and generated persistence operations. Choose according to the data-access pattern rather than assuming one always replaces the other.
See Spring Data projects, Spring JDBC, JdbcTemplate, and Spring’s ORM integration.
Web Applications with Spring Boot
Spring MVC Overview
Spring provides two main web stacks:
| Stack | Programming model | Typical runtime |
|---|---|---|
| Spring MVC | Servlet API, blocking request processing | Embedded Tomcat or Jetty |
| Spring WebFlux | Reactive, non-blocking processing | Reactor Netty or a supported servlet container |
This module focuses on Spring MVC. Adding the Spring Web MVC starter gives the application Spring MVC, an embedded servlet server and JSON support appropriate to the Boot version. Auto-configuration then provides infrastructure such as:
- An embedded web server, listening on port
8080by default. - A
DispatcherServletfront controller. - Handler mappings and handler adapters for annotated controllers.
- HTTP message converters and content negotiation.
- Static resource and error handling.
@Controller is used for MVC controllers that may return view names. @RestController combines @Controller and @ResponseBody, so method return values are written to the HTTP response body.
To customize Spring MVC while retaining Boot’s defaults, implement WebMvcConfigurer without adding @EnableWebMvc. Adding @EnableWebMvc opts out of Boot’s MVC auto-configuration and requires the application to take full control.
Interview point: Spring MVC belongs to the Spring Framework. Spring Boot detects the web stack and configures the server and MVC infrastructure around it.
See Servlet Web Applications and Spring Web MVC.
Spring MVC Request Processing Lifecycle
Spring MVC follows the front controller pattern. REST and server-rendered HTML requests share the same initial processing and differ mainly in how the controller’s return value is handled:
- The servlet container accepts the HTTP request and runs the servlet filter chain. Security and logging filters may execute here, along with Cross-Origin Resource Sharing (CORS) checks. CORS uses HTTP headers to tell a browser whether frontend code from a different origin is allowed to access the API.
- The request reaches Spring MVC’s
DispatcherServlet. - A
HandlerMappingfinds the matching controller method and builds an execution chain containing its interceptors. - A
HandlerAdapterinvokes the method. Argument resolvers supply values for parameters such as@PathVariableand@RequestParam; anHttpMessageConverterreads an@RequestBodywhen present. - The controller delegates to application services and returns a supported value.
- A return-value handler chooses one of two common response paths:
- Response body: With
@ResponseBodyor@RestController, the controller can return a Java domain object or response DTO as data. Spring passes that object to a suitableHttpMessageConverter, which serializes it to a representation such as JSON or XML according to content negotiation.ResponseEntityfollows the same conversion path while additionally controlling the status and headers. - Model and view: In a regular
@Controllerwithout@ResponseBody, a returnedStringis normally a logical view name. The controller adds named data to aModel, or returns aModelAndViewcontaining both. AViewResolvermaps the logical name to aView, such as a Thymeleaf template, and the view renders the model into HTML.
- Response body: With
- The servlet container writes the resulting status, headers, and body to the client.
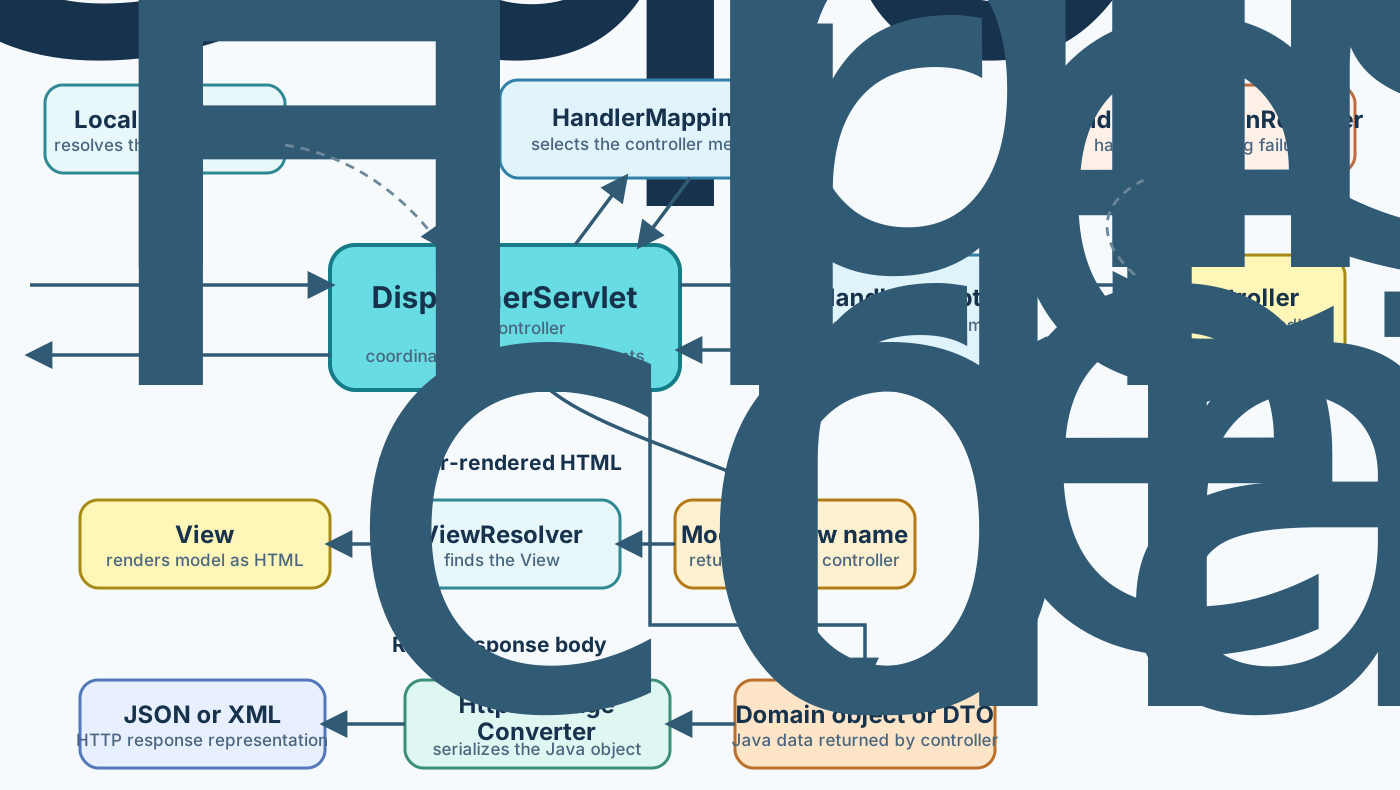
The controller’s return value determines the response path. A model and view name are rendered as HTML; a returned domain object or DTO is passed to an HttpMessageConverter, which can serialize the Java data as JSON or XML.
package com.example.catalog.product;

import org.springframework.http.HttpStatus;
import org.springframework.stereotype.Controller;
import org.springframework.ui.Model;
import org.springframework.web.bind.annotation.GetMapping;
import org.springframework.web.bind.annotation.PathVariable;
import org.springframework.web.bind.annotation.RequestMapping;
import org.springframework.web.server.ResponseStatusException;

@Controller
@RequestMapping("/products")
public class ProductPageController {
	private final ProductService products;

	public ProductPageController(ProductService products) {
		this.products = products;
	}

	@GetMapping("/{id}")
	public String productPage(@PathVariable long id, Model model) {
		var product = products.findById(id).orElseThrow(() ->
			new ResponseStatusException(HttpStatus.NOT_FOUND)
		);

		model.addAttribute("product", product);
		return "product-detail";
	}
}
Here, product is a model attribute available to the template, while product-detail is a logical view name rather than response text. Without @ResponseBody, Spring does not serialize that string as JSON or write it directly to the body.
If processing throws an exception, the HandlerExceptionResolver chain handles it. This includes @ExceptionHandler methods and advice declared with @ControllerAdvice or @RestControllerAdvice.
Filters belong to the servlet layer and can wrap requests before or after the entire servlet. MVC interceptors run around a selected handler and have access to handler metadata. Neither should contain core business logic.
Interview point:
DispatcherServletcoordinates request processing; it delegates mapping, invocation, argument resolution, response conversion and exception handling to specialized components.
See DispatcherServlet, DispatcherServlet Processing, and Controller Method Return Values.
Annotated REST Controllers
The following endpoint demonstrates Spring MVC’s annotation model for GET /api/products/{id} and avoids exposing the persistence entity directly:
package com.example.catalog.product;

import org.springframework.http.ResponseEntity;
import org.springframework.web.bind.annotation.GetMapping;
import org.springframework.web.bind.annotation.PathVariable;
import org.springframework.web.bind.annotation.RequestMapping;
import org.springframework.web.bind.annotation.RestController;

@RestController
@RequestMapping("/api/products")
public class ProductController {
	private final ProductService products;

	public ProductController(ProductService products) {
		this.products = products;
	}

	@GetMapping("/{id}")
	public ResponseEntity<ProductResponse> findById(@PathVariable long id) {
		return products.findById(id)
			.map(ProductResponse::from)
			.map(ResponseEntity::ok)
			.orElseGet(() -> ResponseEntity.notFound().build());
	}
}
package com.example.catalog.product;
import java.math.BigDecimal;
public record ProductResponse(
long id,
String name,
BigDecimal price
) {
public static ProductResponse from(Product product) {
return new ProductResponse(
product.getId(),
product.getName(),
product.getPrice()
);
}
}@RequestMapping defines the common resource path, @GetMapping narrows the mapping to HTTP GET and @PathVariable binds the URI segment to the Java parameter. ResponseEntity controls the response status, headers and body: the example returns 200 OK with a product or 404 Not Found without a body.
A Data Transfer Object (DTO) is a simple object designed to carry data across an application boundary, such as an HTTP request or response. Returning a response DTO decouples the API contract from JPA mappings, prevents accidental serialization of lazy relationships, and allows API fields and persistence fields to evolve independently.
Interview point: A REST controller should translate HTTP input into an application call and translate the result into an HTTP response; business and persistence logic belong in services and repositories.
See Annotated Controllers and Mapping Requests.
HTTP Message Converters
An HttpMessageConverter converts between Java objects and HTTP bodies:
- For
@RequestBody, it reads the request body according to itsContent-Typeheader. - For
@ResponseBody, it writes the return value according to content negotiation, especially the client’sAcceptheader.
The selection also considers the Java type and the media types supported by each converter. Common converters handle strings, byte arrays, form data and JSON. Path variables and query parameters use argument resolution and type conversion, not message converters.
Spring Boot registers sensible defaults and adds any HttpMessageConverter bean found in the application context. The following simplified converter supports text/csv for ProductResponse:
package com.example.catalog.web;

import java.io.IOException;
import java.math.BigDecimal;
import java.nio.charset.StandardCharsets;

import com.example.catalog.product.ProductResponse;
import org.springframework.http.HttpInputMessage;
import org.springframework.http.HttpOutputMessage;
import org.springframework.http.MediaType;
import org.springframework.http.converter.AbstractHttpMessageConverter;

public class ProductCsvMessageConverter
	extends AbstractHttpMessageConverter<ProductResponse> {

	public ProductCsvMessageConverter() {
		super(MediaType.parseMediaType("text/csv"));
	}

	@Override
	protected boolean supports(Class<?> type) {
		return ProductResponse.class.isAssignableFrom(type);
	}

	@Override
	protected ProductResponse readInternal(
		Class<? extends ProductResponse> type,
		HttpInputMessage input) throws IOException {
		var body = new String(
			input.getBody().readAllBytes(),
			StandardCharsets.UTF_8
		);
		var fields = body.split(",", 3);
		return new ProductResponse(
			Long.parseLong(fields[0]),
			fields[1],
			new BigDecimal(fields[2])
		);
	}

	@Override
	protected void writeInternal(
		ProductResponse product,
		HttpOutputMessage output) throws IOException {
		var body = "%d,%s,%s".formatted(
			product.id(),
			product.name(),
			product.price()
		);
		output.getBody().write(body.getBytes(StandardCharsets.UTF_8));
	}
}
package com.example.catalog.web;
import org.springframework.context.annotation.Bean;
import org.springframework.context.annotation.Configuration;
import org.springframework.http.converter.HttpMessageConverter;
@Configuration(proxyBeanMethods = false)
public class MessageConverterConfiguration {
@Bean
HttpMessageConverter<?> productCsvMessageConverter() {
return new ProductCsvMessageConverter();
}
}A client sending Accept: text/csv can now receive the controller’s ProductResponse as CSV. A client accepting JSON continues to use the default JSON converter. Production CSV handling must also escape delimiters, quotes and line breaks; the example focuses on the converter contract.
Avoid replacing the entire converter list unless necessary, because doing so removes useful Boot defaults. Register an additional converter bean or customize the existing list with WebMvcConfigurer.
Interview point:
Content-Typedescribes the format of the incoming body;Acceptdescribes the response formats the client can consume.
See HTTP Message Conversion and Spring Boot HTTP Message Converters.
Traditional WAR Deployment
The executable JAR described in Spring Boot Fundamentals is the preferred deployment model. Use a WAR when an organization requires deployment to an externally managed servlet container. The application class must then support both container initialization and optional standalone execution:
package com.example.catalog;

import org.springframework.boot.SpringApplication;
import org.springframework.boot.autoconfigure.SpringBootApplication;
import org.springframework.boot.builder.SpringApplicationBuilder;
import org.springframework.boot.web.servlet.support.SpringBootServletInitializer;

@SpringBootApplication
public class CatalogApplication extends SpringBootServletInitializer {
	@Override
	protected SpringApplicationBuilder configure(
		SpringApplicationBuilder application) {
		return application.sources(CatalogApplication.class);
	}

	public static void main(String[] args) {
		SpringApplication.run(CatalogApplication.class, args);
	}
}
For WAR packaging, change the build packaging to WAR and mark the embedded servlet container dependency as provided at runtime. The Boot build plugins can still make that WAR executable, allowing it to run with java -jar as well as inside an external container. providedRuntime is preferred to compileOnly in Gradle because tests still need the server classes.
WAR deployment applies to servlet applications. WebFlux applications running on Reactor Netty do not support traditional WAR deployment.
Interview point: JAR versus WAR changes who owns server startup. With an executable JAR, the application starts the server; with a traditional WAR, the external servlet container starts the application.
See Traditional Deployment and Packaging Executable Archives.
RESTful APIs with Spring Boot
REST Fundamentals
The preceding web module covered Spring MVC mechanics. This module focuses on resource design, HTTP semantics and a complete CRUD API.
REST is an architectural style for distributed systems, not a protocol or a Spring-specific feature. A RESTful HTTP API models business concepts as resources identified by URIs and exchanges representations of those resources, commonly as JSON.
Important REST constraints include:
- Client-server: user-interface concerns are separated from data and business concerns.
- Stateless: every request contains the information needed to process it; the server does not rely on conversational client state.
- Cacheable: responses explicitly indicate whether intermediaries and clients may reuse them.
- Uniform interface: resources are manipulated through consistent URIs, HTTP methods, representations and status codes.
- Layered system: clients do not need to know whether they communicate with the origin server, a gateway or a proxy.
HTTP method semantics matter:
| Method | Typical purpose | Safe | Idempotent |
|---|---|---|---|
GET | Retrieve a resource or collection | Yes | Yes |
PUT | Replace the state at a known URI | No | Yes |
POST | Create a subordinate resource or trigger processing | No | No |
DELETE | Remove the resource at a known URI | No | Yes |
Safe means the method is read-only from the client’s perspective. Idempotent means repeating the same request has the same intended server-state effect as sending it once. Responses may still differ—for example, a repeated DELETE may return 404 after the first deletion.
Use plural, noun-based paths such as /api/todos and /api/todos/42. HTTP methods express the action, so paths such as /getTodos or /deleteTodo duplicate information already carried by HTTP.
Interview point: An API that exchanges JSON over HTTP is not automatically RESTful. Resource-oriented URIs, stateless interaction, correct method semantics, status codes and cache behavior are the important parts.
See REST in Spring MVC and HTTP Method Definitions.
Handling GET and PUT
GET retrieves state and must not perform a business mutation. PUT sends the complete desired representation for a known resource URI. It is normally used for replacement; PATCH is a better fit for a partial update.
The following example provides collection and item GET operations plus a PUT operation. The in-memory service keeps the example focused on HTTP behavior:
package com.example.todo;

import java.util.List;

import jakarta.validation.Valid;
import org.springframework.http.ResponseEntity;
import org.springframework.web.bind.annotation.GetMapping;
import org.springframework.web.bind.annotation.PathVariable;
import org.springframework.web.bind.annotation.PutMapping;
import org.springframework.web.bind.annotation.RequestBody;
import org.springframework.web.bind.annotation.RequestMapping;
import org.springframework.web.bind.annotation.RestController;

@RestController
@RequestMapping("/api/todos")
public class TodoReadReplaceController {
	private final TodoService todos;

	public TodoReadReplaceController(TodoService todos) {
		this.todos = todos;
	}

	@GetMapping
	public List<Todo> findAll() {
		return todos.findAll();
	}

	@GetMapping("/{id}")
	public ResponseEntity<Todo> findById(@PathVariable long id) {
		return todos.findById(id)
			.map(ResponseEntity::ok)
			.orElseGet(() -> ResponseEntity.notFound().build());
	}

	@PutMapping("/{id}")
	public ResponseEntity<Todo> replace(
		@PathVariable long id,
		@Valid @RequestBody TodoRequest request) {
		return todos.replace(id, request)
			.map(ResponseEntity::ok)
			.orElseGet(() -> ResponseEntity.notFound().build());
	}
}
package com.example.todo;
import java.util.Comparator;
import java.util.List;
import java.util.Optional;
import java.util.concurrent.ConcurrentHashMap;
import java.util.concurrent.ConcurrentMap;
import java.util.concurrent.atomic.AtomicLong;
import org.springframework.stereotype.Service;
@Service
public class TodoService {
private final ConcurrentMap<Long, Todo> todos = new ConcurrentHashMap<>();
private final AtomicLong ids = new AtomicLong();
public List<Todo> findAll() {
return todos.values().stream()
.sorted(Comparator.comparingLong(Todo::id))
.toList();
}
public Optional<Todo> findById(long id) {
return Optional.ofNullable(todos.get(id));
}
public Optional<Todo> replace(long id, TodoRequest request) {
var replaced = todos.computeIfPresent(
id,
(key, existing) -> new Todo(key, request.title(), request.completed())
);
return Optional.ofNullable(replaced);
}
public Todo create(TodoRequest request) {
long id = ids.incrementAndGet();
var todo = new Todo(id, request.title(), request.completed());
todos.put(id, todo);
return todo;
}
public boolean delete(long id) {
return todos.remove(id) != null;
}
}package com.example.todo;
import jakarta.validation.constraints.NotBlank;
public record TodoRequest(
@NotBlank String title,
boolean completed
) {}package com.example.todo;
public record Todo(
long id,
String title,
boolean completed
) {}The item GET returns 200 OK with a body or 404 Not Found. The PUT returns the replacement with 200 OK; returning 204 No Content would also be valid if the representation is unnecessary. This API chooses to update only existing resources, although PUT may also create the resource when the server permits creation at the client-selected URI.
@RequestBody first delegates JSON deserialization to a message converter, producing a TodoRequest object. Jakarta Bean Validation is a standard for checking an object’s state with constraint annotations; despite the name, the validated object does not have to be a Spring bean.
The validation flow is:
@Validtells Spring MVC to pass the deserializedTodoRequestto its configuredValidatorbefore invoking the controller method.- A Bean Validation provider—normally Hibernate Validator from
spring-boot-starter-validation—examines annotations on the object. Here,@NotBlankrejects anull, empty, or whitespace-only title. - If every constraint passes, Spring calls the controller with the validated request.
- If a constraint fails, Spring raises
MethodArgumentNotValidException; its exception-resolution infrastructure returns400 Bad Requestby default, so the controller method is not called.
An Errors or BindingResult parameter placed immediately after the validated argument can handle violations inside the controller instead. For nested objects, place @Valid on the nested field or record component to cascade validation into it.
Interview point: PUT is idempotent because repeating the same complete replacement produces the same final resource state. It is not necessarily an “update-only” method.
See @RequestBody, Spring Boot Validation, and ResponseEntity.
Handling POST and DELETE
POST to a collection commonly creates a new resource whose identifier is assigned by the server. A successful creation should normally return 201 Created and a Location header containing the new resource URI.
DELETE removes the resource at the target URI. A successful deletion often returns 204 No Content; returning 404 Not Found for an unknown resource is a common API policy.
The methods could be placed in the previous controller. They are separated here only to keep the new operations easy to see:
package com.example.todo;

import java.net.URI;

import jakarta.validation.Valid;
import org.springframework.http.ResponseEntity;
import org.springframework.web.bind.annotation.DeleteMapping;
import org.springframework.web.bind.annotation.PathVariable;
import org.springframework.web.bind.annotation.PostMapping;
import org.springframework.web.bind.annotation.RequestBody;
import org.springframework.web.bind.annotation.RequestMapping;
import org.springframework.web.bind.annotation.RestController;
import org.springframework.web.servlet.support.ServletUriComponentsBuilder;

@RestController
@RequestMapping("/api/todos")
public class TodoCreateDeleteController {
	private final TodoService todos;

	public TodoCreateDeleteController(TodoService todos) {
		this.todos = todos;
	}

	@PostMapping
	public ResponseEntity<Todo> create(
		@Valid @RequestBody TodoRequest request) {
		Todo created = todos.create(request);
		URI location = ServletUriComponentsBuilder
			.fromCurrentRequest()
			.path("/{id}")
			.buildAndExpand(created.id())
			.toUri();

		return ResponseEntity.created(location).body(created);
	}

	@DeleteMapping("/{id}")
	public ResponseEntity<Void> delete(@PathVariable long id) {
		if (!todos.delete(id)) {
			return ResponseEntity.notFound().build();
		}
		return ResponseEntity.noContent().build();
	}
}
ServletUriComponentsBuilder builds the location from the current request rather than hard-coding the host or port. In applications behind a reverse proxy, forwarded-header handling must be configured correctly so generated external URIs use the public scheme and host.
POST is generally not idempotent: retrying a successful create may produce another resource. Clients and servers commonly use an idempotency key when safe retries are required. DELETE is idempotent because repeated requests leave the resource absent, even if later response codes differ.
Interview point: For creation, return
201 Createdwith aLocationheader. For a successful deletion with no response representation, return204 No Content.
See URI Links and Mapping Requests.
Calling REST Services with RestTemplate
RestTemplate is Spring’s original synchronous, blocking REST client. It uses URI templates, an underlying HTTP client and the same HttpMessageConverter abstraction used by Spring MVC. Spring Boot auto-configures a RestTemplateBuilder, not a single RestTemplate, because different clients often need different base URLs, authentication and timeouts.
The following client invokes every operation from the todo API. The property clients.todo.base-url supplies the server’s base URL:
package com.example.todo.client;

import java.net.URI;
import java.util.List;
import java.util.Objects;

import com.example.todo.Todo;
import com.example.todo.TodoRequest;
import org.springframework.boot.restclient.RestTemplateBuilder;
import org.springframework.core.ParameterizedTypeReference;
import org.springframework.http.HttpMethod;
import org.springframework.stereotype.Service;
import org.springframework.web.client.RestTemplate;

@Service
public class TodoApiClient {
	private final RestTemplate restTemplate;

	public TodoApiClient(
		RestTemplateBuilder builder,
		TodoClientProperties properties) {
		this.restTemplate = builder
			.rootUri(properties.baseUrl().toString())
			.build();
	}

	public List<Todo> findAll() {
		var response = restTemplate.exchange(
			"/api/todos",
			HttpMethod.GET,
			null,
			new ParameterizedTypeReference<List<Todo>>() {}
		);
		return Objects.requireNonNullElse(response.getBody(), List.of());
	}

	public Todo findById(long id) {
		return restTemplate.getForObject("/api/todos/{id}", Todo.class, id);
	}

	public URI create(TodoRequest request) {
		return restTemplate.postForLocation("/api/todos", request);
	}

	public void replace(long id, TodoRequest request) {
		restTemplate.put("/api/todos/{id}", request, id);
	}

	public void delete(long id) {
		restTemplate.delete("/api/todos/{id}", id);
	}
}
package com.example.todo.client;
import java.net.URI;
import org.springframework.boot.context.properties.ConfigurationProperties;
@ConfigurationProperties("clients.todo")
public record TodoClientProperties(URI baseUrl) {}package com.example.todo.client;
import org.springframework.boot.context.properties.EnableConfigurationProperties;
import org.springframework.context.annotation.Configuration;
@Configuration(proxyBeanMethods = false)
@EnableConfigurationProperties(TodoClientProperties.class)
public class TodoClientConfiguration {}getForObject returns only the deserialized body, while getForEntity also exposes status and headers. exchange is more general and accepts ParameterizedTypeReference, which preserves generic type information for values such as List<Todo>. postForLocation, put and delete map directly to their HTTP methods.
By default, RestTemplate throws exceptions derived from RestClientResponseException for 4xx and 5xx responses. Configure a ResponseErrorHandler when the application needs different error mapping. Build and reuse a configured client rather than creating or mutating one for every request.
As of Spring Framework 7, RestTemplate is deprecated and planned for removal. Prefer RestClient for new synchronous code and WebClient for non-blocking or streaming work. RestTemplate remains common in Spring Framework 6 and older production applications, so its API is still relevant in interviews.
Interview point:
RestTemplateis blocking. Spring Boot supplies a customizable builder rather than auto-configuring one globalRestTemplateinstance.
See REST Clients and Calling REST Services with Spring Boot.
Testing Spring Boot Applications
Testing Support and Test Types
Add the Spring Boot test starter in test scope. It brings together the main testing infrastructure used by Boot applications, including Spring Test, JUnit Jupiter, AssertJ and Mockito. Security-focused tests additionally need Spring Security’s test module.
Spring Boot supports several test levels:
| Test style | Context | Best use |
|---|---|---|
| Plain JUnit and Mockito | None | Isolated business logic and fast unit tests. |
| Test slice | One application layer | MVC, JPA, JSON or REST-client behavior. |
@SpringBootTest with mock web environment | Full context, no server | Application wiring with mock HTTP handling. |
@SpringBootTest with RANDOM_PORT | Full context and real server | End-to-end application integration. |
@SpringBootTest locates the class annotated with @SpringBootConfiguration, normally the main @SpringBootApplication class, and creates the context through SpringApplication. This includes Boot features such as auto-configuration, external properties and profiles.
Its webEnvironment modes are MOCK (the default mock web context), RANDOM_PORT (a real server on an available port), DEFINED_PORT (a real server on the configured port), and NONE (a non-web context).
The TestContext Framework caches compatible application contexts between test classes. Unnecessary variations in properties, mocks and imported configuration create different cache keys and slow the suite. Use @DirtiesContext only when a test genuinely corrupts shared context state.
Interview point: Spring Boot tests use JUnit as the test engine and Spring Test to manage the application context; Boot adds auto-configuration and convenient test slices.
See Testing and Testing Spring Boot Applications.
Full-context Integration Testing
An integration test should cross meaningful application boundaries. RANDOM_PORT starts the real embedded server on an available port, so the test exercises serialization, filters, routing, services and server configuration through HTTP.
The credentials below match the security configuration shown later in this post:
package com.example.todo;

import org.junit.jupiter.api.Test;
import org.springframework.beans.factory.annotation.Autowired;
import org.springframework.boot.resttestclient.autoconfigure.AutoConfigureRestTestClient;
import org.springframework.boot.test.context.SpringBootTest;
import org.springframework.http.HttpHeaders;
import org.springframework.http.MediaType;
import org.springframework.test.web.servlet.client.RestTestClient;

import static org.assertj.core.api.Assertions.assertThat;
import static org.springframework.boot.test.context.SpringBootTest.WebEnvironment.RANDOM_PORT;

@SpringBootTest(webEnvironment = RANDOM_PORT)
@AutoConfigureRestTestClient
class TodoApplicationIntegrationTest {
	@Test
	void createsThenReadsTodo(@Autowired RestTestClient client) {
		Todo created = client.post()
			.uri("/api/todos")
			.headers(headers -> headers.setBasicAuth("writer", "writer-password"))
			.contentType(MediaType.APPLICATION_JSON)
			.body(new TodoRequest("Review Spring Boot", false))
			.exchange()
			.expectStatus().isCreated()
			.expectHeader().exists(HttpHeaders.LOCATION)
			.expectBody(Todo.class)
			.returnResult()
			.getResponseBody();

		assertThat(created).isNotNull();

		client.get()
			.uri("/api/todos/{id}", created.id())
			.headers(headers -> headers.setBasicAuth("writer", "writer-password"))
			.exchange()
			.expectStatus().isOk()
			.expectBody(Todo.class).isEqualTo(created);
	}
}
A real-server test runs the client and server in separate threads. Consequently, @Transactional on the test method does not roll back transactions committed by the server. Clean data explicitly, use isolated schemas or containers, or perform setup and teardown through repository operations.
Use production-like infrastructure when behavior depends on a specific database, broker or cache. An embedded substitute can miss differences in SQL dialects, transaction isolation and vendor features.
Interview point:
RANDOM_PORTverifies the actual server boundary. It is slower than a mock web test and does not share the test thread’s transaction.
See Testing with a Running Server.
MockMvc Integration Testing
MockMvc executes the Spring MVC request-processing pipeline without opening a network port. It can exercise request mappings, validation, message conversion, controller advice and the security filter chain while remaining faster than a real-server test.
@SpringBootTest loads the full context, and @AutoConfigureMockMvc creates the MockMvc client:
package com.example.todo;

import org.junit.jupiter.api.Test;
import org.springframework.beans.factory.annotation.Autowired;
import org.springframework.boot.test.context.SpringBootTest;
import org.springframework.boot.webmvc.test.autoconfigure.AutoConfigureMockMvc;
import org.springframework.test.web.servlet.MockMvc;

import static org.springframework.security.test.web.servlet.request.SecurityMockMvcRequestPostProcessors.httpBasic;
import static org.springframework.test.web.servlet.request.MockMvcRequestBuilders.get;
import static org.springframework.test.web.servlet.result.MockMvcResultMatchers.jsonPath;
import static org.springframework.test.web.servlet.result.MockMvcResultMatchers.status;

@SpringBootTest
@AutoConfigureMockMvc
class TodoMockMvcIntegrationTest {
	@Autowired
	MockMvc mvc;

	@Autowired
	TodoService todos;

	@Test
	void returnsTodoAsJson() throws Exception {
		Todo todo = todos.create(new TodoRequest("Practice MockMvc", false));

		mvc.perform(get("/api/todos/{id}", todo.id())
				.with(httpBasic("reader", "reader-password")))
			.andExpect(status().isOk())
			.andExpect(jsonPath("$.id").value(todo.id()))
			.andExpect(jsonPath("$.title").value("Practice MockMvc"));
	}
}
MockMvc is server-side testing: no socket is opened and the servlet container itself is not tested. Use it for detailed MVC assertions; retain a smaller number of real-server tests for deployment and network-boundary confidence.
Interview point:
@SpringBootTestplus@AutoConfigureMockMvcloads the complete application but uses a mock servlet environment. It is still an integration test, not a controller slice.
See MockMvc and Auto-configured Spring MVC Tests.
Test Slices
A test slice loads only the auto-configuration and application components needed for one concern. Common slices include:
| Annotation | Focus |
|---|---|
@WebMvcTest | MVC controllers, advice, converters and MockMvc. |
@DataJpaTest | JPA entities, repositories and an embedded test database when available. |
@RestClientTest | A REST client plus MockRestServiceServer. |
@JsonTest | JSON serialization and deserialization. |
@WebMvcTest does not scan regular service beans. Replace the controller’s collaborator with @MockitoBean:
package com.example.todo;

import java.util.Optional;

import org.junit.jupiter.api.Test;
import org.springframework.beans.factory.annotation.Autowired;
import org.springframework.boot.webmvc.test.autoconfigure.WebMvcTest;
import org.springframework.security.test.context.support.WithMockUser;
import org.springframework.test.context.bean.override.mockito.MockitoBean;
import org.springframework.test.web.servlet.MockMvc;

import static org.mockito.BDDMockito.given;
import static org.springframework.test.web.servlet.request.MockMvcRequestBuilders.get;
import static org.springframework.test.web.servlet.result.MockMvcResultMatchers.jsonPath;
import static org.springframework.test.web.servlet.result.MockMvcResultMatchers.status;

@WebMvcTest(TodoReadReplaceController.class)
class TodoControllerSliceTest {
	@Autowired
	MockMvc mvc;

	@MockitoBean
	TodoService todos;

	@Test
	@WithMockUser(authorities = "todo:read")
	void returnsTodoFromService() throws Exception {
		given(todos.findById(7L))
			.willReturn(Optional.of(new Todo(7L, "Study slices", false)));

		mvc.perform(get("/api/todos/7"))
			.andExpect(status().isOk())
			.andExpect(jsonPath("$.title").value("Study slices"));
	}
}
The slice verifies HTTP mapping and JSON output but not the real TodoService. @DataJpaTest follows the same principle for persistence and rolls transactions back by default. Import only essential extra configuration; importing the entire application defeats the speed and isolation benefits of a slice.
Interview point: A slice test answers whether one framework-facing layer is configured correctly. A full-context test answers whether the application layers work together.
See Test Slices.
Spring Security
Securing a REST API
Adding the Spring Security starter causes Boot to secure web applications by default. For a custom REST policy, expose a SecurityFilterChain bean. Spring Security runs as a servlet filter chain before the request reaches Spring MVC.
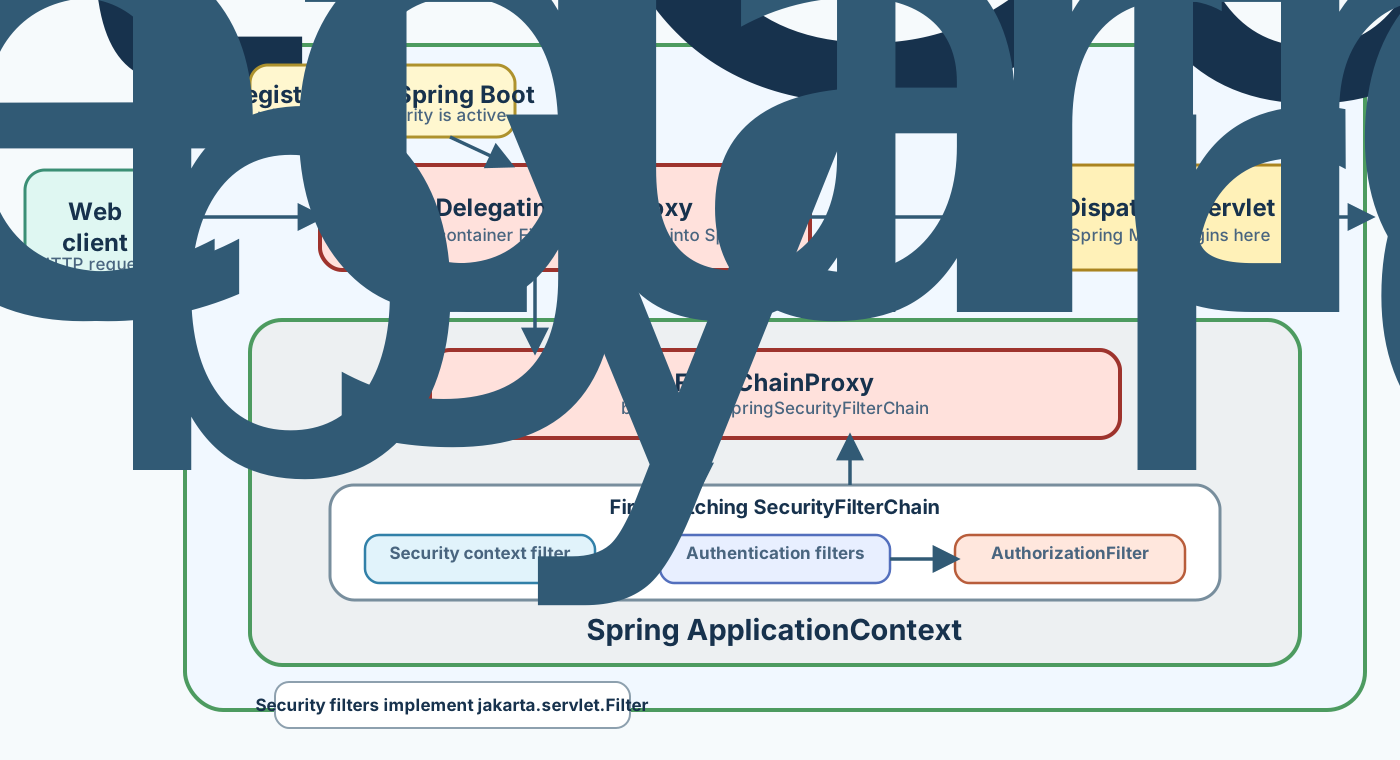
DelegatingFilterProxy bridges the servlet container to Spring’s application context. It delegates to the FilterChainProxy bean named springSecurityFilterChain; that proxy selects the first matching SecurityFilterChain, runs its ordered security filters, and then lets the request continue to Spring MVC.
The main concepts are:
- Authentication: establishes who the caller is and creates an
Authenticationin theSecurityContext. - Authorization: decides whether that authenticated principal may perform the requested action.
- 401 Unauthorized: authentication is missing or invalid.
- 403 Forbidden: authentication succeeded, but the caller lacks permission.
REST APIs commonly use HTTP Basic for simple internal services or bearer tokens for OAuth 2 resource servers. HTTP Basic is easy to demonstrate but sends only Base64-encoded credentials, not encrypted credentials, so TLS is mandatory.
For stateless APIs, avoid relying on server-side HTTP sessions. Each request should carry its authentication credentials. Production systems should use a persistent identity provider, database or OAuth 2 authorization server rather than Boot’s generated development password.
Interview point: Spring Security filters authenticate and authorize before
DispatcherServletinvokes the controller. Authentication answers “who”; authorization answers “may they do this”.
See Servlet Security Architecture and Spring Boot Security.
Request-level Authorization
authorizeHttpRequests declares request authorization rules. Rules are evaluated in declaration order, and the first matching rule wins:
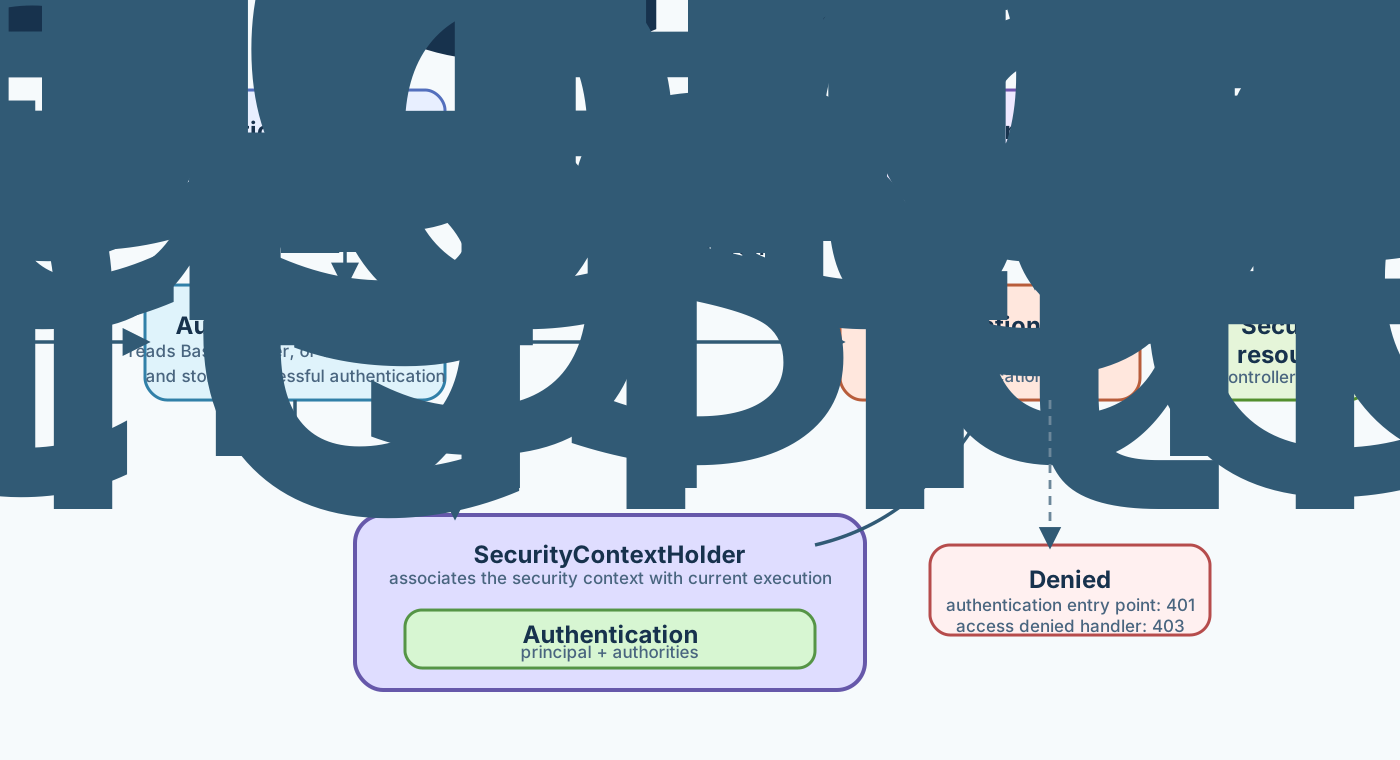
Authentication filters establish the caller first. On success, the resulting Authentication contains the principal and authorities and is stored in the SecurityContextHolder. Later, AuthorizationFilter obtains that authentication and delegates to an AuthorizationManager, which evaluates the configured request rules. A grant continues to the secured resource; a denial becomes a 401 or 403 response as appropriate.
package com.example.todo.security;

import org.springframework.context.annotation.Bean;
import org.springframework.context.annotation.Configuration;
import org.springframework.http.HttpMethod;
import org.springframework.security.config.annotation.web.builders.HttpSecurity;
import org.springframework.security.config.http.SessionCreationPolicy;
import org.springframework.security.web.SecurityFilterChain;

import static org.springframework.security.config.Customizer.withDefaults;

@Configuration(proxyBeanMethods = false)
public class ApiSecurityConfiguration {
	@Bean
	SecurityFilterChain apiSecurity(HttpSecurity http) throws Exception {
		http
			.csrf(csrf -> csrf.disable())
			.sessionManagement(session -> session
				.sessionCreationPolicy(SessionCreationPolicy.STATELESS))
			.authorizeHttpRequests(authorize -> authorize
				.requestMatchers("/actuator/health").permitAll()
				.requestMatchers(HttpMethod.GET, "/api/todos/**")
					.hasAuthority("todo:read")
				.requestMatchers("/api/todos/**")
					.hasAuthority("todo:write")
				.anyRequest().denyAll())
			.httpBasic(withDefaults());

		return http.build();
	}
}
The public health rule must appear before broader rules. GET requests need todo:read; all other methods under /api/todos/** need todo:write; unmatched requests are denied by default.
hasRole("ADMIN") is shorthand for hasAuthority("ROLE_ADMIN"). Use roles for coarse groups and authorities for explicit permissions. Do not include the ROLE_ prefix when calling hasRole.
This example disables CSRF because it assumes a non-browser API whose credentials are explicitly attached to requests. Keep CSRF protection for cookie-based authentication and for browser clients that automatically attach credentials, including browser-used HTTP Basic authentication.
Interview point:
securityMatcherchooses whichSecurityFilterChainapplies;requestMatcherschoose authorization rules inside that chain. If no chain matches a request, Spring Security does not protect it.
See Authorize HTTP Requests and Java Configuration.
Username and Password Authentication
For username-and-password authentication, a DaoAuthenticationProvider uses a UserDetailsService to load the user and a PasswordEncoder to verify the submitted password.
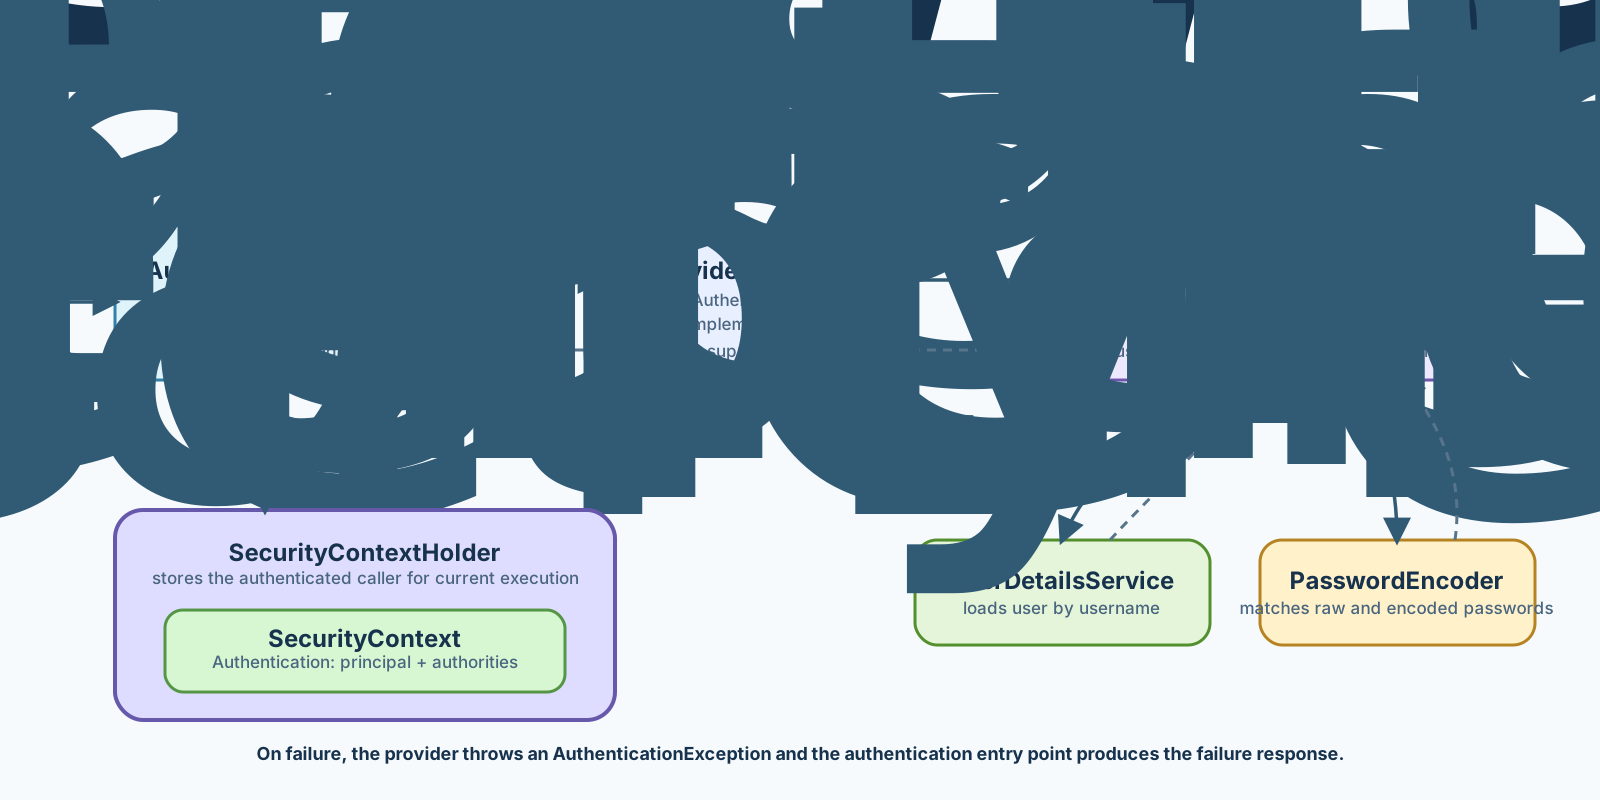
The filter creates an unauthenticated UsernamePasswordAuthenticationToken. ProviderManager, the common AuthenticationManager implementation, delegates it to a provider that supports that token type. DaoAuthenticationProvider loads UserDetails and asks PasswordEncoder to compare the submitted password with the stored encoded password. On success, the authenticated token returns to the filter and is stored in the SecurityContextHolder.
The following in-memory users support the earlier examples. This setup is suitable for learning and tests, not production identity storage:
package com.example.todo.security;

import org.springframework.context.annotation.Bean;
import org.springframework.context.annotation.Configuration;
import org.springframework.security.core.userdetails.User;
import org.springframework.security.core.userdetails.UserDetails;
import org.springframework.security.core.userdetails.UserDetailsService;
import org.springframework.security.crypto.factory.PasswordEncoderFactories;
import org.springframework.security.crypto.password.PasswordEncoder;
import org.springframework.security.provisioning.InMemoryUserDetailsManager;

@Configuration(proxyBeanMethods = false)
public class UserAuthenticationConfiguration {
	@Bean
	PasswordEncoder passwordEncoder() {
		return PasswordEncoderFactories.createDelegatingPasswordEncoder();
	}

	@Bean
	UserDetailsService users(PasswordEncoder encoder) {
		UserDetails reader = User.withUsername("reader")
			.password(encoder.encode("reader-password"))
			.authorities("todo:read")
			.build();

		UserDetails writer = User.withUsername("writer")
			.password(encoder.encode("writer-password"))
			.authorities("todo:read", "todo:write")
			.build();

		return new InMemoryUserDetailsManager(reader, writer);
	}
}
DelegatingPasswordEncoder stores an algorithm identifier with each hash, such as {bcrypt}, allowing password encoding to evolve. Never store plaintext passwords or use {noop} in production.
For database authentication, implement UserDetailsService or provide an AuthenticationProvider that integrates with the identity store. For token-based APIs, configure the application as an OAuth 2 resource server and validate signed access tokens rather than accepting passwords on every request.
Authentication mechanisms and authorization rules are separate: replacing HTTP Basic with bearer tokens does not require rewriting hasAuthority rules if both mechanisms produce the same authorities.
Interview point:
UserDetailsServiceretrieves user data;PasswordEncoderverifies password hashes;AuthenticationProvidercoordinates the authentication decision.
See Username/Password Authentication, UserDetailsService and PasswordEncoder.
Method Security and Security Testing
URL rules protect HTTP entry points. Method security protects service operations regardless of whether they are called from MVC, messaging, scheduling or another bean. Enable it with @EnableMethodSecurity, then use annotations such as @PreAuthorize, @PostAuthorize, @PreFilter and @PostFilter.
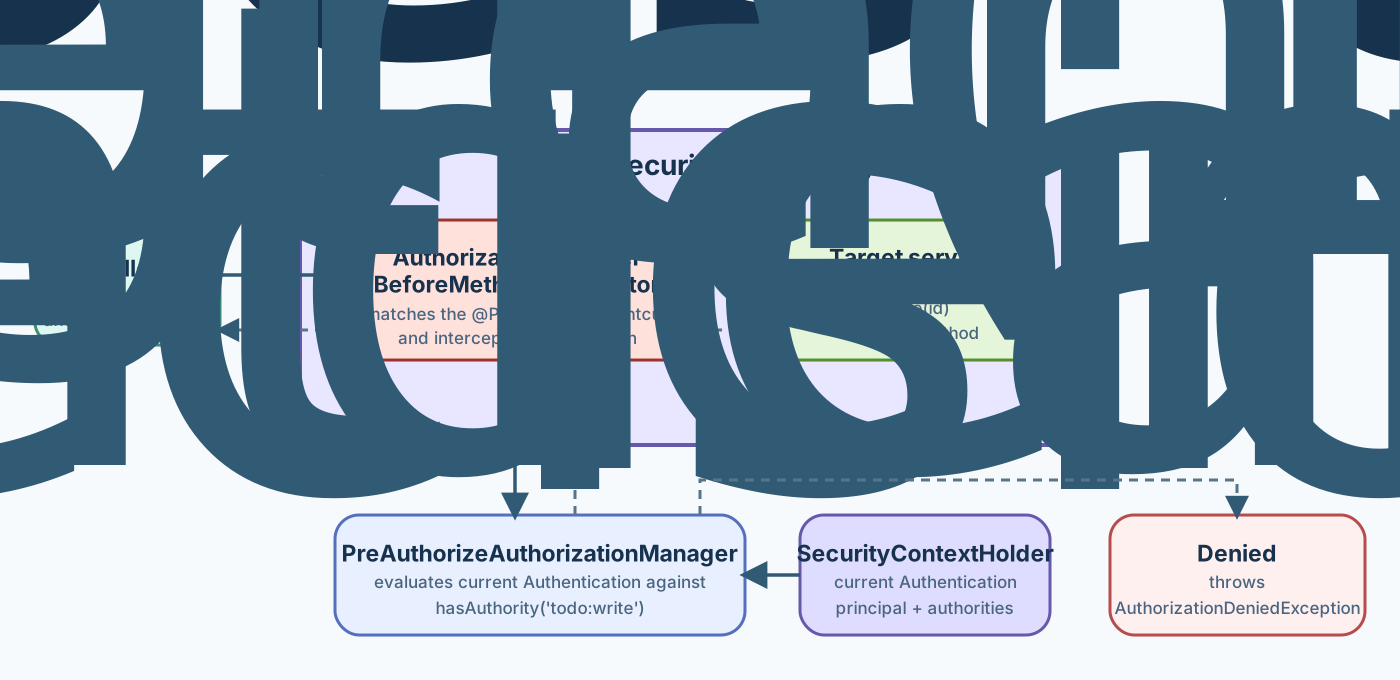
For @PreAuthorize, the proxy invokes an AuthorizationManagerBeforeMethodInterceptor before the target. Its PreAuthorizeAuthorizationManager evaluates the expression using the current Authentication and method invocation. A grant proceeds to the service method; a denial throws an AuthorizationDeniedException without invoking the target.
package com.example.todo.security;

import com.example.todo.TodoService;
import org.springframework.security.access.prepost.PreAuthorize;
import org.springframework.stereotype.Service;

@Service
public class TodoAdministrationService {
	private final TodoService todos;

	public TodoAdministrationService(TodoService todos) {
		this.todos = todos;
	}

	@PreAuthorize("hasAuthority('todo:write')")
	public boolean delete(long id) {
		return todos.delete(id);
	}
}
package com.example.todo.security;
import org.springframework.context.annotation.Configuration;
import org.springframework.security.config.annotation.method.configuration.EnableMethodSecurity;
@Configuration(proxyBeanMethods = false)
@EnableMethodSecurity
public class MethodSecurityConfiguration {}package com.example.todo.security;
import org.junit.jupiter.api.Test;
import org.springframework.beans.factory.annotation.Autowired;
import org.springframework.boot.test.context.SpringBootTest;
import org.springframework.security.authorization.AuthorizationDeniedException;
import org.springframework.security.test.context.support.WithMockUser;
import static org.junit.jupiter.api.Assertions.assertDoesNotThrow;
import static org.junit.jupiter.api.Assertions.assertThrows;
@SpringBootTest
class TodoMethodSecurityTest {
@Autowired
TodoAdministrationService administration;
@Test
@WithMockUser(authorities = "todo:read")
void readerCannotDelete() {
assertThrows(
AuthorizationDeniedException.class,
() -> administration.delete(1L)
);
}
@Test
@WithMockUser(authorities = "todo:write")
void writerCanDelete() {
assertDoesNotThrow(() -> administration.delete(1L));
}
}Method security is proxy-based. Calls must cross the Spring proxy; self-invocation from one method to another in the same object bypasses interception. Place authorization on public service methods that represent meaningful application operations.
Test URL authorization separately through MockMvc:
package com.example.todo.security;

import org.junit.jupiter.api.Test;
import org.springframework.beans.factory.annotation.Autowired;
import org.springframework.boot.test.context.SpringBootTest;
import org.springframework.boot.webmvc.test.autoconfigure.AutoConfigureMockMvc;
import org.springframework.security.test.context.support.WithMockUser;
import org.springframework.test.web.servlet.MockMvc;

import static org.springframework.test.web.servlet.request.MockMvcRequestBuilders.delete;
import static org.springframework.test.web.servlet.request.MockMvcRequestBuilders.get;
import static org.springframework.test.web.servlet.result.MockMvcResultMatchers.status;

@SpringBootTest
@AutoConfigureMockMvc
class TodoUrlAuthorizationTest {
	@Autowired
	MockMvc mvc;

	@Test
	void anonymousUserIsUnauthorized() throws Exception {
		mvc.perform(get("/api/todos"))
			.andExpect(status().isUnauthorized());
	}

	@Test
	@WithMockUser(authorities = "todo:read")
	void readerCannotDelete() throws Exception {
		mvc.perform(delete("/api/todos/1"))
			.andExpect(status().isForbidden());
	}
}
@WithMockUser places a test Authentication in the security context without calling the real authentication mechanism. Use httpBasic, jwt or other MockMvc request post-processors when the authentication filter itself is part of what the test must verify. Mutating requests also need the csrf() request post-processor when CSRF protection is enabled.
Interview point: Test authentication, URL authorization and method authorization as separate concerns.
@WithMockUserbypasses credential verification and is intended for authorization-focused tests.
See Method Security, Method Security Testing and MockMvc Security Support.
Spring Boot Actuator
Actuator, Metrics, and Health
Spring Boot Actuator adds production-ready monitoring and management features. It exposes information through technology-independent endpoints that can be published over HTTP or JMX.
The terms describe different layers:
| Concept | Purpose | Example |
|---|---|---|
| Actuator endpoint | Makes management data or operations accessible. | /actuator/health, /actuator/metrics |
| Metric | A numeric time series measured repeatedly. | Request count, JVM memory, latency |
| Health indicator | Reports whether one component can perform its responsibility. | Database connectivity is UP or DOWN |
Common endpoints include:
| Endpoint | Information |
|---|---|
health | Aggregated application and dependency health. |
metrics | Meter names and diagnostic measurements. |
prometheus | Prometheus-formatted scrape output when its registry is present. |
info | Application information contributed by configured providers. |
conditions | Why auto-configurations matched or did not match. |
loggers | Logger names and levels; some operations can change levels. |
mappings | Registered web request mappings. |
env and configprops | Environment and configuration properties, subject to sanitization. |
Metrics answer questions such as “how often?” and “how long?”. Health answers “can this instance currently perform its responsibility?”. Logs explain discrete events, while traces follow work across service boundaries. A useful production system normally uses all four signals.
Actuator is not a monitoring dashboard or long-term time-series database. It produces and exports telemetry that systems such as Prometheus, Grafana, Datadog or an OpenTelemetry collector can consume.
Interview point: Actuator provides management endpoints; Micrometer instruments and exports metrics; health contributors supply component status to the health endpoint.
See Production-ready Features, Endpoints and Observability.
Configuring Actuator
Add the Spring Boot Actuator starter. Boot then auto-configures endpoints and contributors based on the application type, classpath and available beans. HTTP endpoint URLs use /actuator/{id} by default.
An endpoint has three separate concerns:
- Enabled: its bean exists in the application context.
- Exposed: it is published over HTTP or JMX.
- Authorized: the caller is allowed to access it.
Only health is exposed over HTTP and JMX by default. Expose the smallest set operations actually require. Common configuration properties include:
management.endpoints.web.exposure.include- Example:
health,info,metrics,prometheus - Exposes the selected HTTP endpoints.
- Example:
management.endpoints.web.exposure.exclude- Example:
env,beans - Removes endpoints even if they were included.
- Example:
management.endpoints.web.base-path- Example:
/manage - Changes the HTTP base path.
- Example:
management.server.port- Example:
8081 - Runs management endpoints on another port.
- Example:
management.endpoints.access.max-permitted- Example:
read-only - Prevents write access across endpoints.
- Example:
management.endpoint.health.show-details- Example:
when-authorized - Restricts health details to authorized callers.
- Example:
If the application defines any SecurityFilterChain, Boot’s management security backs off. The application must then secure Actuator explicitly. With the security configuration from the previous module, give Actuator a higher-priority chain:
package com.example.todo.security;

import org.springframework.boot.security.autoconfigure.actuate.web.servlet.EndpointRequest;
import org.springframework.context.annotation.Bean;
import org.springframework.context.annotation.Configuration;
import org.springframework.core.annotation.Order;
import org.springframework.security.config.annotation.web.builders.HttpSecurity;
import org.springframework.security.web.SecurityFilterChain;

import static org.springframework.security.config.Customizer.withDefaults;

@Configuration(proxyBeanMethods = false)
public class ActuatorSecurityConfiguration {
	@Bean
	@Order(1)
	SecurityFilterChain actuatorSecurity(HttpSecurity http) throws Exception {
		http
			.securityMatcher(EndpointRequest.toAnyEndpoint())
			.authorizeHttpRequests(authorize -> authorize
				.requestMatchers(EndpointRequest.to("health")).permitAll()
				.anyRequest().hasAuthority("actuator:read"))
			.httpBasic(withDefaults());

		return http.build();
	}
}
EndpointRequest follows the configured management base path, unlike a hard-coded /actuator/** pattern. A second, lower-priority filter chain must still secure normal application requests. Give operational users the actuator:read authority through the real identity store.
Do not expose sensitive endpoints publicly. A separate management port helps network isolation but is not a security boundary by itself. It can also report healthy while the main application port is unable to serve traffic, so probes may need additional paths on the main port.
Interview point: Enabling an endpoint creates it; exposing it publishes it; Spring Security controls who can call it. These are independent decisions.
See Enabling Production-ready Features, Monitoring over HTTP and Actuator Security.
Application Metrics with Micrometer
Spring Boot uses Micrometer as its vendor-neutral metrics facade. It auto-configures a composite MeterRegistry and adds a registry implementation for each supported monitoring system found on the classpath. Adding a runtime dependency such as the Prometheus registry is normally enough to configure export.
Common meter types are:
| Meter | Use |
|---|---|
Counter | A monotonically increasing event count. |
Gauge | A value that may increase or decrease, sampled when observed. |
Timer | Event count plus duration distribution. |
DistributionSummary | Distribution of non-time values such as payload sizes. |
Boot automatically instruments JVM memory and garbage collection, CPU and process activity, HTTP requests, supported connection pools, caches and other integrated libraries. Servlet request metrics normally use the meter name http.server.requests.
Inject the Spring-managed MeterRegistry for application-specific metrics:
package com.example.todo.metrics;

import com.example.todo.Todo;
import com.example.todo.TodoRequest;
import com.example.todo.TodoService;
import io.micrometer.core.instrument.Counter;
import io.micrometer.core.instrument.MeterRegistry;
import io.micrometer.core.instrument.Timer;
import org.springframework.stereotype.Service;

@Service
public class MeteredTodoService {
	private final TodoService todos;
	private final Counter created;
	private final Timer creationDuration;

	public MeteredTodoService(TodoService todos, MeterRegistry registry) {
		this.todos = todos;
		this.created = Counter.builder("todo.created")
			.description("Number of created todo items")
			.register(registry);
		this.creationDuration = Timer.builder("todo.creation.duration")
			.description("Time spent creating a todo item")
			.register(registry);
	}

	public Todo create(TodoRequest request) {
		return creationDuration.record(() -> {
			Todo todo = todos.create(request);
			created.increment();
			return todo;
		});
	}
}
A timer already publishes an event count, total time and duration statistics. Add a separate counter only when its name or business meaning is independently useful.
Tags create dimensions for filtering and aggregation. Use bounded values such as operation, outcome, region or status. Never use unbounded values such as user IDs, todo IDs, raw URLs or exception messages; high-cardinality tags can exhaust memory and make monitoring systems expensive.
The /actuator/metrics endpoint is for diagnostic inspection. /actuator/metrics/todo.created examines one meter using its Micrometer name. Production monitoring usually exports to a registry; with Prometheus, expose /actuator/prometheus and let Prometheus scrape it.
Micrometer Observation can produce metrics and traces from the same instrumented operation. Prefer observations when an operation needs correlated tracing as well as timing.
Interview point: Counters only increase; gauges represent current sampled values; timers record both count and duration. Tag cardinality must remain bounded.
See Metrics and Micrometer Observation.
Health Indicators and Probes
The health endpoint aggregates registered HealthContributor beans. Boot auto-configures indicators when relevant technology is available, including disk space, databases, Redis, MongoDB, RabbitMQ and application availability.
Standard statuses include:
| Status | Meaning |
|---|---|
UP | The component is functioning. |
DOWN | The component cannot function. |
OUT_OF_SERVICE | The component is intentionally unavailable. |
UNKNOWN | Health cannot be determined. |
Define a HealthIndicator bean for an important dependency that Boot does not already understand. The bean name, with a trailing HealthIndicator removed, becomes the component ID—in this example, todoStore:
package com.example.todo.health;

import java.time.Duration;

import org.springframework.boot.health.contributor.Health;
import org.springframework.boot.health.contributor.HealthIndicator;
import org.springframework.stereotype.Component;

@Component
public class TodoStoreHealthIndicator implements HealthIndicator {
	private final TodoStoreClient store;

	public TodoStoreHealthIndicator(TodoStoreClient store) {
		this.store = store;
	}

	@Override
	public Health health() {
		long started = System.nanoTime();
		try {
			if (!store.isReachable()) {
				return Health.down()
					.withDetail("reason", "Store ping failed")
					.build();
			}

			long responseTime = Duration.ofNanos(
				System.nanoTime() - started
			).toMillis();
			return Health.up()
				.withDetail("responseTimeMs", responseTime)
				.build();
		}
		catch (RuntimeException exception) {
			return Health.down(exception).build();
		}
	}
}
package com.example.todo.health;
public interface TodoStoreClient {
boolean isReachable();
}Health checks run repeatedly, so they must be fast, bounded by timeouts and free of side effects. Do not expose credentials, internal URLs or exception details to unauthorized callers. For reactive applications, implement ReactiveHealthIndicator so slow I/O does not block the event loop.
Health groups allow different audiences to see different contributors. Kubernetes commonly uses:
- Liveness: whether the application is internally broken and should be restarted. Do not make liveness depend on shared external systems; an outage could restart every instance and worsen the failure.
- Readiness: whether the instance should currently receive traffic. Readiness may include essential external dependencies when the application cannot serve requests without them.
The probe groups are available at /actuator/health/liveness and /actuator/health/readiness when enabled. management.endpoint.health.show-details defaults to never; prefer when-authorized rather than exposing dependency details publicly.
Interview point: Liveness asks whether restarting this instance could help. Readiness asks whether traffic should be routed to it now.
See Health Information, Kubernetes Probes and Health API.